Crackmes for lazies: angr demonstration
I have been playing crackmes and CTFs all the time to boost my reverse engineering knowledge and learn new stuff, but there are times that you find some challenges boring or without new unique technics so you develop some automation tools to pass the challenges. So in this blog post, I’m gonna show you my ultimate tool to solve these types of challenges.
What is angr and why?
According to the angr’s website:
angr is a multi-architecture binary analysis toolkit, with the capability to perform dynamic symbolic execution (like Mayhem, KLEE, etc.) and various static analyses on binaries.
why am I using angr? cause angr is a pain-free toolkit with a supporting binding for Python programming language and makes binary analysis easy. the scenario is simple: find the location or function that prints the flag and give the address to angr. If you wait long enough, angr will give you the right input to reach the requested flag
Symbolic execution
Let’s make things clear for ourselves. What is the goal of a typical crackme? Find the right input that passes the checks (some conditional branches) and prints the flag. According to Wikipedia:
In computer science, symbolic execution (also symbolic evaluation) is a means of analyzing a program to determine what inputs cause each part of a program to execute. An interpreter follows the program, assuming symbolic values for inputs rather than obtaining actual inputs as normal execution of the program would. It thus arrives at expressions in terms of those symbols for expressions and variables in the program, and constraints in terms of those symbols for the possible outcomes of each conditional branch. link!
So angr will assume the input as a symbolic value and with the power of symbolic execution, it will find the path which leads to eventual printing of the flag. After finding the path, we have a series of conditions that our input needs to pass them to reach that location. angr will solve these conditions using SMT solver, like z3, in order to ask questions like “given the output of this sequence of operations, what must the input have been?”
Demo time
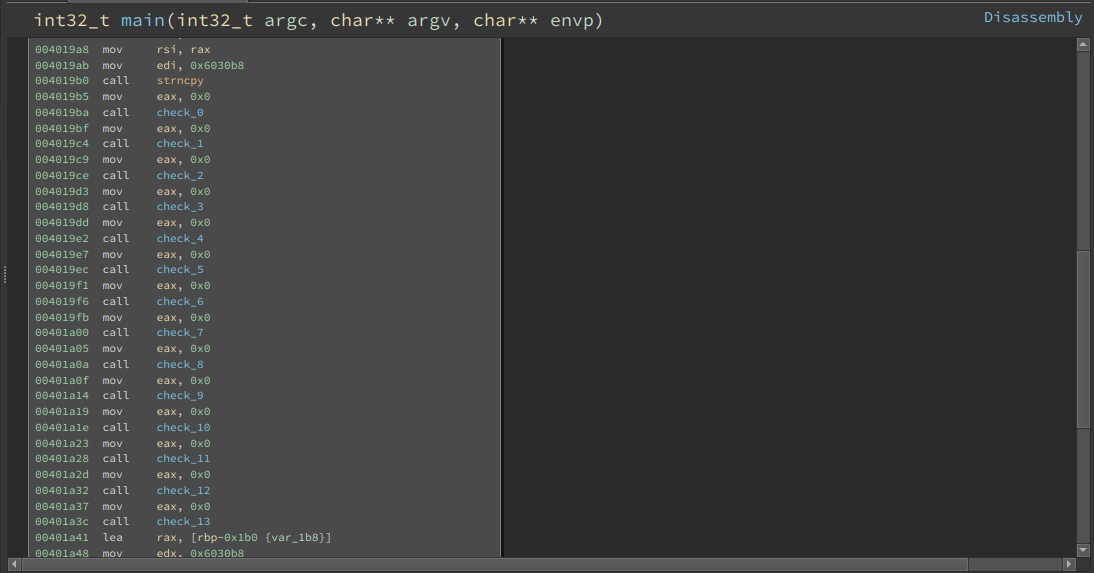
I found an interesting crackme challenge that has 13 checks. It will be much harder to follow these checks manually but with the power of angr, the challenges will be done with ~10 lines of code and ~30sec of computing time.

for this challenege,i wrote this code:
import angr
import claripy

project = angr.Project('./keygen', load_options={'auto_load_libs': False})
argv1 = claripy.BVS('argv1', 0xF * 8)
initial_state = project.factory.entry_state(args=['./keygen', argv1])
sm = project.factory.simulation_manager(initial_state)
sm.explore(find=0x401a5a, avoid=0x401a73)
result = sm.found[0]
print(result.solver.eval(argv1, cast_to=bytes))
Now it’s the time to dissect the code. First of all, you need to install angr with pip. angr has dropped python2 support and you need python3 to use angr.
pip install angr
# or
pip3 install angr
In this line, we create a Project object and ./keygen is the relative address to our binary. what about load_options?
The CFG analysis does not distinguish between code from different binary objects. This means that by default, it will try to analyze control flow through loaded shared libraries. Since processing the shared libraries will probably prolong the analysis to even days, it’s almost never intended behavior. To load a binary without shared libraries, add the following keyword argument to the Project constructor:
load_options={'auto_load_libs': False}. link!
project = angr.Project('./keygen', load_options={'auto_load_libs': False})
After that, we need to define our input (argv1) as a symbolic value. BVS creates a 32-bit symbolic bit vector with the size of 0xF * 8. you need to define the size equal or bigger than the correct input. link!
argv1 = claripy.BVS('argv1', 0xF * 8)
angr has 4 initial states:
blank_state()constructs a “blank slate” blank state, with most of its data left uninitialized. When accessing uninitialized data, an unconstrained symbolic value will be returned.entry_state()constructs a state ready to execute at the main binary’s entry point.full_init_state()constructs a state that is ready to execute through any initializers that need to be run before the main binary’s entry point, for example, shared library constructors or preinitializers. When it is finished with these it will jump to the entry point.call_state()constructs a state ready to execute a given function.
Our binary gets input as an argv and according to the docs:
If you’re executing in an environment that can take command line arguments or an environment, you can pass a list of arguments through args and a dictionary of environment variables through
envintoentry_stateandfull_init_state. The values in these structures can be strings or bitvectors, and will be serialized into the state as the arguments and environment to the simulated execution. link!
so in this line, we picked entry_state to pass the symbolic value argv1.
initial_state = project.factory.entry_state(args=['./keygen', argv1])
The most important control interface in angr is the
SimulationManager, which allows you to control symbolic execution over groups of states simultaneously, applying search strategies to explore a program’s state space. link!
We need to define SimulationManager and path the initial_state to it.
sm = project.factory.simulation_manager(initial_state)
An extremely common operation in symbolic execution is to find a state that reaches a certain address, while discarding all states that go through another address. Simulation manager has a shortcut for this pattern, the .explore() method.
When launching .explore() with a find argument, execution will run until a state is found that matches the find condition. find condition can be the address of an instruction to stop, a list of addresses to stop, or a function which takes a state and returns whether it meets some criteria. When any of the states in the active stash match the find condition, they are placed in the found stash, and execution terminates. You can then explore the found state, or decide to discard it and continue with the other ones. You can also specify an avoid condition in the same format as find. When a state matches the avoid condition, it is put in the avoided stash, and execution continues.
sm.explore(find=0x401a5a, avoid=0x401a73)
Let’s look at the binary:
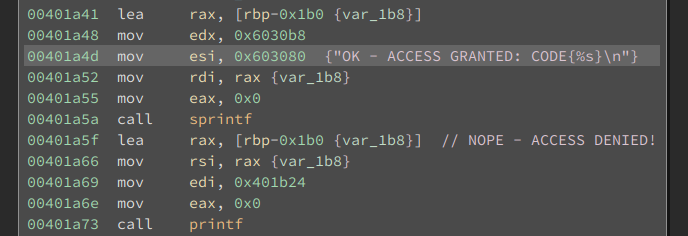
The address of ACCESS GRANTED print is 0x401a5a and the adress of ACCESS DENIED print is 0x401a73.
I wrote the last two lines to grab the first value from the found stash and cast that value to byte and print the final result.
result = sm.found[0]
print(result.solver.eval(argv1, cast_to=bytes))
Let’s run our program to see the result:

That’s it, I hope you find this useful.
