Automated dynamic import resolving using binary emulation
Analyzing malwares is often not an easy task because there are lots of tricks and techniques that malwares use to evade detection and classification or to make the post-analysis more difficult. One such trick is to resolve windows API calls dynamically (called “dynamic import resolving”).
In this blog post, we will talk about dynamic import resolving and a pattern to detect it when reversing malwares, how to defeat this trick using binary emulation and Qiling framework (resolve API calls and extract function names), and finally we will integrate our emulation framework with Ghidra.
In the last section, we will talk about a solution to run Python version 3 and Qiling trough Ghidra so we can see the result of our script inside the decompiler/disassembler view. It will make post-analysis easier.
As a real-life example, we will analyze Netwalker which used this technique and we will discuss our idea around that sample.
What is dynamic import resolving
Let’s talk about dynamic import resolving and indirect function calls. It’s a common technique that malwares use to hide their intention, make the static analysis more difficult, bypass some red flags, etc.
In this technique, the malware tries to create an IAT (Import Address Table) during the execution so there is no sign of used API calls in the PE header.
This technique often shows up in a specific pattern; At the beginning of the execution, the program will build an array of function pointers which works like an IAT and the malware can use stored function pointers with indirect calls as shown below:
It’s rather difficult to determine which function would be called by these indirect function calls without actually executing the binary.
To dynamically make a function pointer, the two API calls LoadLibraryA() and GetProcAddress() are often used.
According to the Microsoft docs, LoadLibraryA():
Loads the specified module into the address space of the calling process. The specified module may cause other modules to be loaded.
HMODULE LoadLibraryA(
  LPCSTR lpLibFileName
);
And GetProcAddress():
Retrieves the address of an exported function or variable from the specified dynamic-link library (DLL).
FARPROC GetProcAddress(
  HMODULE hModule,
  LPCSTR  lpProcName
);
Look at this pseudo-code as a demonstration:
typedef ret_type (__stdcall *f_func)(param_a, param_b);

HINSTANCE hLibrary = LoadLibrary("ntdll.dll");
f_func LocalNtCreateFile = (f_func)GetProcAddress(hLibrary, "NtCreateFile");
LocalNtCreateFile is a function pointer which points to NtCreateFile, which can be stored in an array a.k.a IAT.
To make things more spicy, sometimes malware authors also encrypt the strings passed to LoadLibrary() and GetProcAddress() like what Netwalker did. It will be near to impossible to analyze malware without solving this problem first.
Choosing the approach
To solve these types of techniques and tricks there are a few approaches. For example, we can sometimes decrypt passed strings statically or we can develop an IDA plugin (or any disassembler and decompiler that supports plugins) but that would be a rather time-consuming task. Alternatively, we can use debuggers to execute the malware step by step, and rename variables according to dynamically resolved functions but this is a lot of repetition.
I chose binary emulation because it gives us the best of both worlds, We can have the power of automation and the ease of debugging. It’s worth mentioning that emulating can be very slow at times, especially when dealing with encryption and decryption algorithms. Personally, I think this is an acceptable trade-off.
For binary emulation we will use Qiling. Read my previous post to see why.
Analyzing Netwalker
Today’s sample is NetWalker link! . Netwalker used dynamic import resolving technique with encrypted strings so it is a good example for us to demonstrate our idea and approach around that.
As discussed before, most of the time malwares will try to build an IAT at the beginning of the execution - and NetWalker does this.
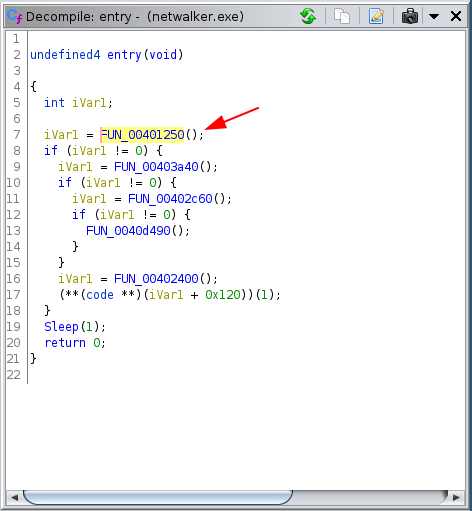
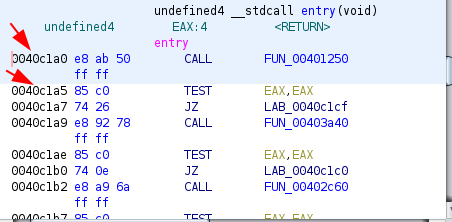
After disassembling the malware, we can see a function call right after the entry.
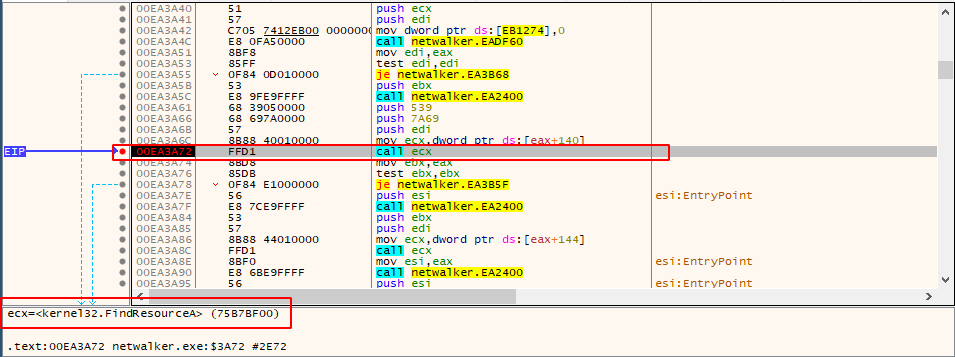
Jumping to that function, we can see the pattern mentioned above; A function is called multiple times and the return value is stored in an array.
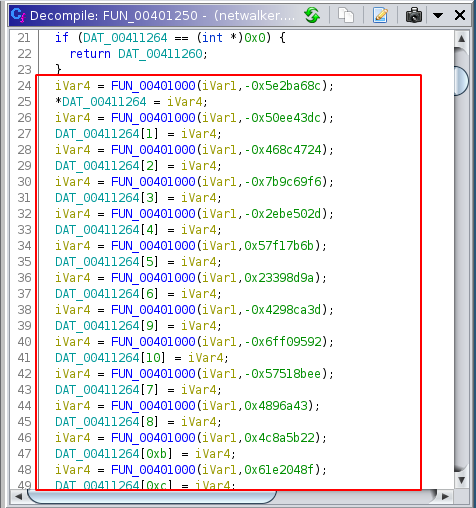
This pattern is a sign of dynamic import resolving. We can confirm our guess with a debugger like below:
Let’s jump to the code and write a script to extract these function names.
I’ve discussed the basics of the Qiling like hook_code() and ql.mem.read in the previous post.
In such scenarios, we don’t need to emulate the entire malware, we just need to execute the dynamic import table resolution bit. So we need to find the start and the end of that section. This is rather easy because our target is inside a function, so we only need to emulate that specific function.
ql.run(begin=0x0040c1a0, end=0x0040c1a5)
In this process of analyzing malwares with binary emulation, you need only be creative. For example, in this sample, there are plenty of approaches that you can use; however I chose the easiest and fastest (specifically development time, this solution performs rather badly).
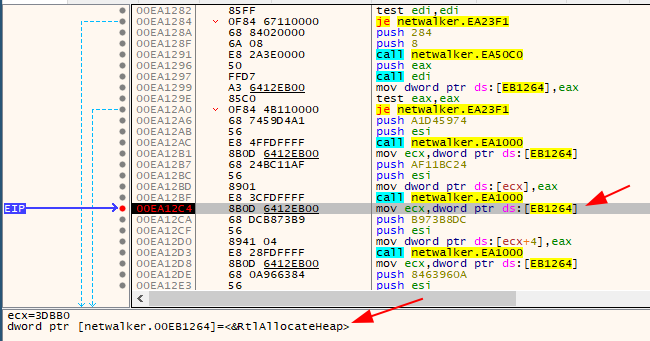
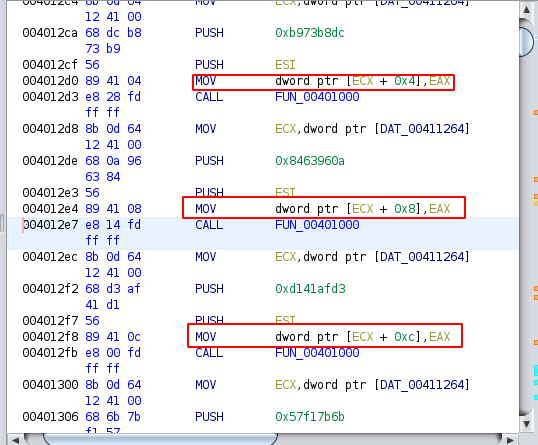
Let’s talk about the approach. As you can see in the image below, the return value of the (probably) decrypter and resolver function is stored in the eax register and then moved to dword ptr [ecx + int]. So we just need to hook the code and extract the value of eax in the right location.
We can run the emulator and try to hook_code() to catch every instruction that is going to be executed.
ql.hook_code(extract_eax)
As you may notice, extract_eax() is a callback function that is designed to extract the value of eax. Qiling will pass the ql (sandbox) object, the address and the size of the instruction to this callback function.
We can extract the instruction inside extract_eax() with mem.read() as below:
buf = ql.mem.read(address, size)
buf is a Python bytearray of our instruction. The next step is detecting the right location to extract eax. By looking at the disassembler we can see a pattern. the first part of the opcode is similar.
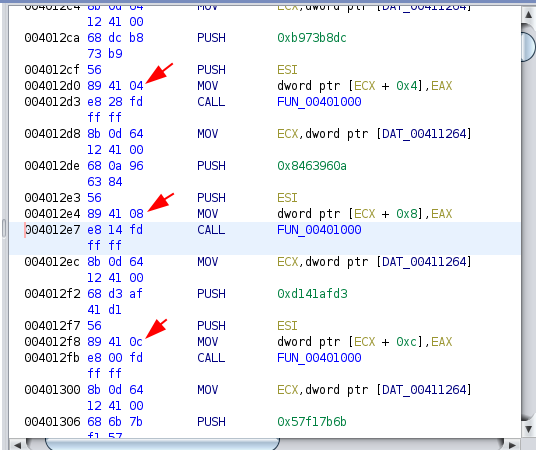
Next if will detect the right location:
if "8941" in buf.hex():
to extract eax value we need to do this:
eax_value = ql.reg.eax
eax_value is an address that points to an API call. We can search that address inside import_symbols to extract the API name.
func = ql.loader.import_symbols[eax_value]
func_dll = func["dll"]
func_name = func["name"].decode("ascii")

print(f"found {func_dll}.{func_name} at {hex(address)}")
Fulll code will be:
def extract_eax(ql, address, size):
    buf = ql.mem.read(address, size)

    if "8941" in buf.hex(): # dword ptr [ECX + hex],EAX
        eax_value = ql.reg.eax
        func = ql.loader.import_symbols[eax_value]
        func_dll = func["dll"]
        func_name = func["name"].decode("ascii")

        print(f"found {func_dll}.{func_name} at {hex(address)}")
This was easy! right? Next, we need to integrate our scipt with Ghidra to actually use the information we got here. This will help us to see extracted API names inside Ghidra.
Integrating Qiling with Ghidra
As you probably know Ghidra uses Jython and Jython only supports Python version 2 but Qiling is based on Python version 3. I found an interesting project called ghidra_bridge link! that helps us solve this problem.
So Ghidra Bridge is an effort to sidestep that problem - instead of being stuck in Jython, set up an RPC proxy for Python objects, so we can call into Ghidra/Jython-land to get the data we need, then bring it back to a more up-to-date Python with all the packages you need to do your work.
After installing ghidra_bridge you can find an example inside the installation directory called example_py3_from_ghidra_bridge.py. By opening this file we will have an idea about how to write scripts based on ghidra_bridge. Let’s dissect it.
Most scripts should use this minimal template:
def run_script(server_host, server_port):

    import ghidra_bridge
    with ghidra_bridge.GhidraBridge(namespace=globals(), response_timeout=500):
        pass


if __name__ == "__main__":

    in_ghidra = False
    try:
        import ghidra
        # we're in ghidra!
        in_ghidra = True
    except ModuleNotFoundError:
        # not ghidra
        pass

    if in_ghidra:
        import ghidra_bridge_server
        script_file = getSourceFile().getAbsolutePath()
        # spin up a ghidra_bridge_server and spawn the script in external python to connect back to it
        ghidra_bridge_server.GhidraBridgeServer.run_script_across_ghidra_bridge(script_file)
    else:
        # we're being run outside ghidra! (almost certainly from spawned by run_script_across_ghidra_bridge())

        parser = argparse.ArgumentParser(
            description="py3 script that's expected to be called from ghidra with a bridge")
        # the script needs to handle these command-line arguments and use them to connect back to the ghidra server that spawned it
        parser.add_argument("--connect_to_host", type=str, required=False,
                            default="127.0.0.1", help="IP to connect to the ghidra_bridge server")
        parser.add_argument("--connect_to_port", type=int, required=True,
                            help="Port to connect to the ghidra_bridge server")

        args = parser.parse_args()

        run_script(server_host=args.connect_to_host,
                   server_port=args.connect_to_port)
We only need to focus on run_script() function. The other part is static and probably there is no need to change. Only inside run_script() you are allowed to use Python 3 syntax and only here you are allowed to load Python 3 libraries (like Qiling). As you may notice I added response_timeout to the GhidraBridge object and sets it’s value to 500 seconds. Why? because as we discussed earlier emulating is a time-consuming task and emulating decryptor functions is likely more time-consuming because there is so much instruction code that needs to be emulated. So we need to set response_timeout to prevent any timeout-related errors.
Leaving aside the base template, we can now write our Qiling code inside run_script().
def run_script(server_host, server_port):
    from qiling import Qiling

    import ghidra_bridge
    with ghidra_bridge.GhidraBridge(namespace=globals(), response_timeout=500):

        ql = Qiling(["/home/lopqto/w/automated/samples/netwalker.exe"], "/home/lopqto/w/automated/rootfs/x86_windows", output = "debug")
        ql.hook_code(extract_eax)
        ql.run(begin=0x0040c1a0, end=0x0040c1a5)
Back to the extract_eax() function, we need to integrate it with Ghidra and add extracted API names as a comment into Ghidra. To add a comment from a script first of all we need an address (location). We have the address value from Qiling but we need to convert this value to Ghidra’s Address type.
To do this we need memory.blocks object from currentProgram API. But there is a challenge here. currentProgram API only is accessible inside run_script(). But we need this API inside extract_eax() callback. There is a cool trick to handle this situation. You need to pass things around with ql object like below:
ql.target_block = currentProgram.memory.blocks[0]
Now we can access to ql.target_block inside extract_eax(). target_block (memory.blocks[0]) points to the PE entrypoint at 0x00400000. to convert address to Address type we need to calculate offset and do something like this:
target_address = ql.target_block.getStart()
target_address = target_address.add(address - 0x00400000)
Now we have our target_address so we need one more step. accessing comment API is similar to above. First we need getListring() object:
ql.listing = currentProgram.getListing()
And to add a comment we can do:
codeUnit = ql.listing.getCodeUnitAt(target_address)
comment_message = "{}.{}".format(func_dll, func_name)
codeUnit.setComment(codeUnit.PRE_COMMENT, comment_message)
Full source code for extract_eax() will be this:
def extract_eax(ql, address, size):
    buf = ql.mem.read(address, size)
    if "8941" in buf.hex(): # dword ptr [ECX + hex],EAX

        eax_value = ql.reg.eax
        func = ql.loader.import_symbols[eax_value]
        func_dll = func["dll"]
        func_name = func["name"].decode("ascii")
        target_address = ql.target_block.getStart()
        target_address = target_address.add(address - 0x00400000)
        codeUnit = ql.listing.getCodeUnitAt(target_address)
        comment = "{}.{}".format(func_dll, func_name)
        codeUnit.setComment(codeUnit.PRE_COMMENT, comment)
Now we have a Ghidra script that will use Python3 to run samples trough Qiling and extract dynamic resolved function names and comment them into Ghidra. See the final result:
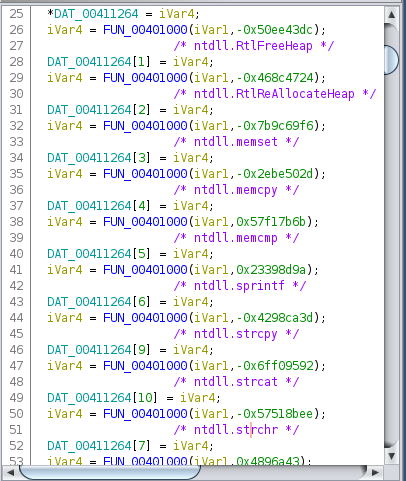
And we are done. :)
Tips and tricks
Two tricks helped me to make this script. First of all, tracing the binary and printing assembly instructions can help a lot while debugging source!:
md = Cs(CS_ARCH_X86, CS_MODE_64)

def print_asm(ql, address, size):
    buf = ql.mem.read(address, size)
    for i in md.disasm(buf, address):
        print(":: 0x%x:\t%s\t%s" %(i.address, i.mnemonic, i.op_str))

ql.hook_code(print_asm)
You can compare emulation result with your disassembler to debug your program.
The second tip is when you try to run a time-consuming script and write something back to Ghidra (like adding a comment) you may face with an error like this:
ERROR (BackgroundCommandTask) Command Failure: An unexpected error occurred while processing the command: Auto Analysis java.lang.RuntimeException: Timed-out waiting to run a Swing task--potential deadlock!
It’s because java closed the file and to solve this problem you need to increase timeout. Open the file in ghidra/support/launch.properties and add this line:
VMARGS=-Dghidra.util.Swing.timeout.seconds=3600
Conclusion
The idea described in this article can be extended and used to analyze any other malware families that dynamically resolve imports. It’s not an ultimate general solution and you need to change things a little bit to match it against your target binary. I tried to explain my mindset behind the scene as much as possible to help you in this process. Hope this post was helpful.
Don’t hesitate to ping me if there is something wrong or if you want to discuss about the post. I dropped the final script and the malware sample here!.
